***Note: this guide was created on January 24th 2021. If something does not work, please email us***
There are many ways to run a multisite controller of Unifi. In the cloud or even local on your own network. This way works both in the cloud (tested on vultr and digital ocean) as well as locally on a Ubuntu system.
If you want a vultr account, click here and get $100 (limited time offer)
If you want a Digital Ocean account, click here and get $100 (limited time offer)
Step 1: Install your VM
For this, I’m going to use Vultr because this is where I’m setting up this customers controller.
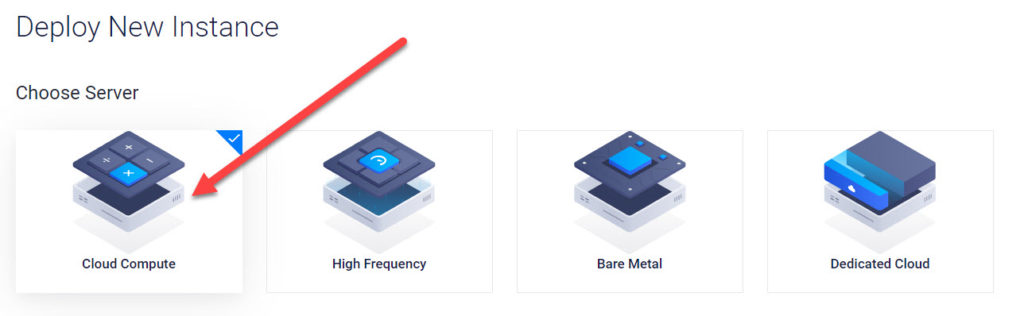
Log into Vultr and get to the main dashboard (it should say ‘Products’). Click the blue circled ‘+’ symbol in the upper right. This will bring you to the new server setup page. When you get the ‘Deploy New Instance’ screen, make sure ‘Cloud Compute’ is selected.
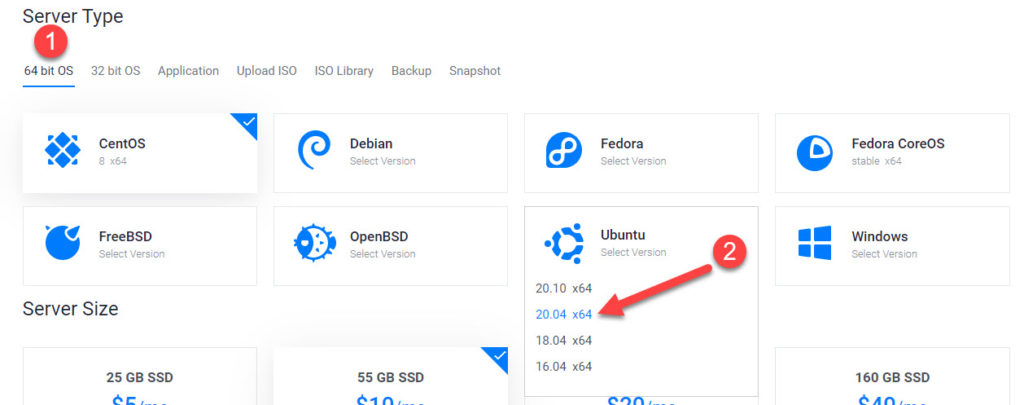
Pick whichever data center you want – I always pick what is closest to me or the client I’m creating this for. For the server type, PLEASE make sure you select 64 bit (x64). You will have issues if a 32 bit option is available and you pick that.
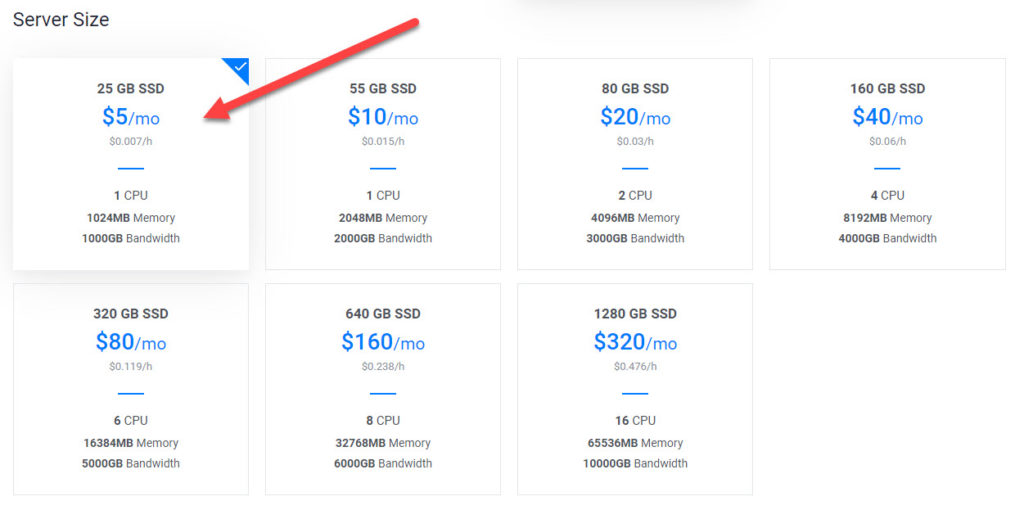
Now, for the server size, if you’re following along in Vultr or Digital Ocean, the $5 a month server is good enough BUT if you’re hosting more than 20 (in my opinion) sites, I would bump this up to the $20 plan. In the additional features section, auto backups is an option I would pick. Since this is a production system, having a backup is always a great idea. The final step is to give your server a host name. I always properly name these so I don’t forget what they are.
Once your server is ‘Running’ you’ll be shown the server IP and root password. Copy the IP as next we’re going to create a domain registration for this server.
Part 2 – DNS Record
Since you now know your IP address, you should log into your DNS hosting provider or DNS server and create a new A record that points the hostname that you created in Step 1 to the IP address of your server. This will be needed in the future when we create the secure SSL certificate for the UniFi Controller, as well as for the Let’s Encrypt SSL certificate.
Part 3 – Logging into your new server
Now the fun begins, open a ssh session (I prefer putty) and login into your server.
Now that we’re in, we want to change that root password. Even though it is a long and complicated password, it is ALWAYS best practice to change it. Type in the command below
passwd rootYou will be asked to enter your root password twice – make sure it is a STRONG password.
Part 4 – Create a new user
Since 99.9% of linux systems use root as their user, we’re going to change this. Remember, leaving things at default is NEVER a good idea.
For this, I’m going to use a generic user but please, DO NOT use a basic user name.
adduser ubntadminThis command will have you set a password for the new user, and you can also optionally enter in some additional information such as their real name and contact info.
Next give root (sudo group) privileges to the newly created user:
usermod -aG sudo unifiadminThis new user will now be able to use the ‘sudo’ command to run commands as root.
OPTIONAL BUT RECOMMENDED:
We STONGLY recommend that you create a SSH key to login to your server. We wont go over it in this guide but we can do this for you. Just ask our live support agent to get started.
Part 5 – Changing the SSH Port
Close the current SSH session you have since this is logged in as root. Start a new SSH session and login with the new user name and password you created earlier.
Once you’re in, we’re going to edit the SSH config. This is going to change the existing SSH port to something else.
sudo nano -w /etc/ssh/sshd_configNow go to the line that says Port 22 and change that to a different port number but be careful, you want to change it to a non standard port. In this example, I use 2222 but again, some unwanted users look for this number
Port 2222Now do a CTRL-X, then a Y and then enter to save the changes. Once that is done, you’ll want to restart SSH.
Enter in:
sudo systemctl reload sshdNext, let’s start a new PuTTY session using all of the same settings from Part 9, but this time also change the port to whichever port you changed SSH to. In our case, it was port 2222. If you previously saved your PuTTY session, you should save it again with the new port number.
Part 6: Firewall
Time for the big stuff. Time to secure our server even more by using some firewall rules to lock everything down.
Ubuntu uses the UFW firewall, however it is not enabled by default. First, we are going to add all of the firewall rules that we need to connect to UniFi, and then we will turn it on.
First, let’s allow our new SSH port and lock it down so that connections to this port are only allowed from our IP address:
sudo ufw allow from [IP address] to any port [SSH port number]In this example, if your IP address is 1.2.3.4, and your SSH port is 2222, the command should be the code below (NOTE: If you have a dynamic IP, please but “any” instead of your IP:
sudo ufw allow from 1.2.3.4 to any port 2222Now we need the Unifi GUI port opened. Important note here – you don’t actually HAVE to open up this port to the outside world if you are instead using Ubiquiti’s Single Sign On (SSO) account to access your UniFi Controller through https://unifi.ubnt.com. BUT – you will have to use this port at least once to enable cloud access in UniFi. You can either wait to do your firewall rules until after cloud access has been enabled, or you can disable this rule afterwards.
sudo ufw allow from 1.2.3.4 to any port 8443Now, we need a few more ports opened up so unfi will work. We’re going to need the STUN port as well as some ports for guest portal. These are the ports I open so if you want other, now is the time to open them but be careful, opening up too many will hurt the security of the server.
sudo ufw allow 3478/udp
sudo ufw allow 8080
sudo ufw allow 8880
sudo ufw allow 8843
We’re also going to need to open up ports 80 and 443 for Let’s Encrypt. If anyone browses directly to those services, they will get a connection refused response.
sudo ufw allow 80
sudo ufw allow 443
Now all the settings we need are done. We can now enable the firewall.
sudo ufw enableTo check the status, use the below command:
sudo ufw status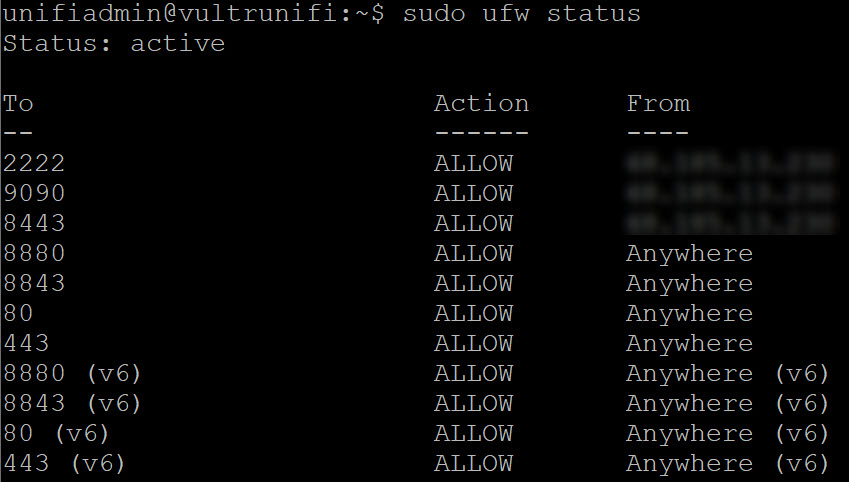
Part 7: Updating and Installing
Almost there. It’s now time to update the server and get our packages ready. Let’s run some updates:
sudo apt update
sudo apt upgrade -y
sudo apt dist-upgrade -y
It’s possible that no updates will be needed, but if you are asked whether or not to proceed on any of these steps, just answer Y.
One thing many people forget to do is setup the small stuff. Lets get to those now.
Configure the time zone:
sudo dpkg-reconfigure tzdataA pink bordered window will appear – select your geographic area and then select your city/time zone from the list. You can press TAB, arrow keys, and SPACE to move around these screens and make selections.
Once your time zone has been selected, press OK.
Next it’s time to install NTP (Network Time Protocol). Run the following commands:
sudo apt update && sudo apt install ntp -y
Once installed, make sure the NTP service has started by running:
service ntp status
You should see that NTP is ‘active (running)’ in green text. If you type:
date
Your local time should show correctly.
Setting up a swap file is completely optional but i always choose to do it. I have never noticed a decrease in performance by setting this up, so what’s the harm?
Run the following commands to create and use a swap file.
sudo fallocate -l 4G /swapfile
The ‘fallocate’ command creates a file of a specific size – in this case we’re creating a 4GB file called ‘swapfile.’
sudo chmod 600 /swapfile
Sets permissions on the swap file that we just created.
sudo mkswap /swapfile
Formats the /swapfile for use as a swap file.
sudo swapon /swapfile
Tells the server to use that directory as a swap file.
Finally, we need to make sure that the swap file turns on every time we reboot the server. Run the following command to add the swap file information to the /etc/fstab file:
sudo sh -c 'echo "/swapfile none swap sw 0 0" >> /etc/fstab'
To verify that the command worked, type:
cat /etc/fstab
and look for a line (at the bottom of the file) that says:
/swapfile none swap sw 0 0
If that line exists in the /etc/fstab file, you’re all good.
Install OpenJDK-8.
sudo apt update && sudo apt install openjdk-8-jdk -y
Part 8: Install Unifi
FINALLY! We’re at the part where we all wanted to be.
There are a few different ways to download and install UniFi, the easiest way to install and maintain the UniFi package for me is to use apt, so that is what we will do in our example.
First, we need to add an apt source for UniFi. To do this, run the following commands:
echo 'deb http://www.ubnt.com/downloads/unifi/debian stable ubiquiti' | sudo tee /etc/apt/sources.list.d/100-ubnt-unifi.list
sudo wget -O /etc/apt/trusted.gpg.d/unifi-repo.gpg https://dl.ubnt.com/unifi/unifi-repo.gpg
These commands set up the apt repository for UniFi and installs the trusted GPG key. Now let’s install UniFi:
sudo apt update && sudo apt install unifi -y
You should now have installed the latest stable version of UniFi, which is version 6.0.43 as of the writing of this article.
Now, open a browser and go to your domain, https://unifi.domain.com:8443 and just go through the Unifi Wizard :). You will get security notices but you can skip them since we haven’t installed the certificate yet.
Part 9: Security Certificate
We’re going to set up Let’s Encrypt now so we can get the lovely HTTPS communication with the server. We’re going to use Certbot to set up Let’s Encrypt – this well help to automate the entire process.
Install Certbot and Apache connector:
sudo apt update && sudo apt install certbot python3-certbot-apache -y
Now Certbot is installed, so the next step is to generate our SSL certificate.
sudo certbot --apache -d unifi.yourdomain.com
Substitute your own FQDN instead of unifi.yourdomain.com. When prompted, enter in an email address for use with the SSL cert. Then press A to Agree when prompted followed by Y or N to share your email address with the Electronic Frontier Foundation (I said Y). Next you will be asked if you want to redirect all HTTP traffic to HTTPS – choose option 2. Your Let’s Encrypt certificate has now been installed.
Next, we need to import that SSL certificate into UniFi.
A developer named Steve Jenkins created a really great script that automates the rest of the process, making it super easy. So, thanks to Steve, and let’s download his script and modify a few settings.
sudo wget https://raw.githubusercontent.com/stevejenkins/unifi-linux-utils/master/unifi_ssl_import.sh -O /usr/local/bin/unifi_ssl_import.sh

sudo chmod +x /usr/local/bin/unifi_ssl_import.sh
Next, edit the /usr/local/bin/unifi_ssl_import.sh file that we imported:
sudo nano -w /usr/local/bin/unifi_ssl_import.sh
Find the line that says ‘UNIFI_HOSTNAME’ and change it to your own FQDN:
UNIFI_HOSTNAME=unifi.yourdomain.com
Next, since we are on a Ubuntu Vultr server instead of a flavor of RedHat (which the script was based on), we need to comment out the RedHat stuff and uncomment the Debian/Ubuntu stuff:
# Uncomment following three lines for Fedora/RedHat/CentOS
#UNIFI_DIR=/opt/UniFi
#JAVA_DIR=${UNIFI_DIR}
#KEYSTORE=${UNIFI_DIR}/data/keystore

# Uncomment following three lines for Debian/Ubuntu
UNIFI_DIR=/var/lib/unifi
JAVA_DIR=/usr/lib/unifi
KEYSTORE=${UNIFI_DIR}/keystore
Next, enable Lets Encrypt mode (change LE_MODE=no to LE_MODE=yes):
LE_MODE=yes
LE_LIVE_DIR=/etc/letsencrypt/live
Save and exit nano by doing CTRL+X followed by Y.
Finally, run the script!
sudo /usr/local/bin/unifi_ssl_import.sh
If you now close your browser and then re-open it to https://unifi.yourdomain.com:8443, you should no longer have the security warnings, and you will have a valid HTTPS certificate installed.
Almost done. Since a Let’s Encrypt certificate needs to be renewed every 3 months, we can need to create a script that imports this every time our certificate renews.
sudo nano -w /etc/cron.daily/unifi_ssl_import
Add these lines to the file:
#!/bin/bash
/usr/local/bin/unifi_ssl_import.sh
CTRL+X followed by Y to save and exit.
Now we need to set the permissions on the file so that it runs as root and as an executable script.
sudo chown root:root /etc/cron.daily/unifi_ssl_import

sudo chmod +x /etc/cron.daily/unifi_ssl_import
ALL DONE!! You now have a basic unifi controller hosted in the cloud.
If you would like us to help you with this or build and maintain a cloud controller for you, please reach out to us on Live Chat or by contacting us


Looking forward to your video series! Thank You!! Gill Jarret Garth